Java Web三大基本组件,我们知道SpringMVC主要就是构建在Servlet的基础上的,接下来我们看一下Filter的使用姿势
I. Filter说明
在介绍filter的使用之前,有必要知道下什么是fitler。
Filter称为过滤器,主要用来拦截http请求,做一些其他的事情
1. 流程说明
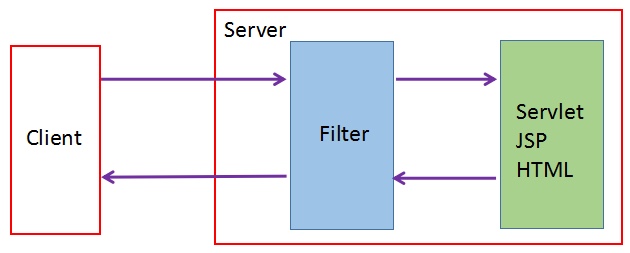
一个http请求过来之后
- 首先进入filter,执行相关业务逻辑
- 若判定通行,则进入Servlet逻辑,Servlet执行完毕之后,又返回Filter,最后在返回给请求方
- 判定失败,直接返回,不需要将请求发给Servlet
2. 场景
通过上面的流程,可以推算使用场景:
- 在filter层,来获取用户的身份
- 可以考虑在filter层做一些常规的校验(如参数校验,referer校验等)
- 可以在filter层做稳定性相关的工作(如全链路打点,可以在filter层分配一个traceId;也可以在这一层做限流等)
II. 使用姿势
1. 基本配置
在前面Java Config搭建了一个简单的web应用,我们的filter测试也放在这个demo工程上继续
pom配置如下
1
2
3
4
5
6
7
8
9
10
11
12
13
14
15
16
17
18
19
20
21
22
23
24
25
26
27
28
29
30
31
32
33
34
35
36
37
38
39
40
41
42
43
44
45
46
47
48
49
50
51
52
53
54
55
56
57
58
| <properties>
<spring.version>5.1.5.RELEASE</spring.version>
</properties>
<dependencies>
<dependency>
<groupId>javax.servlet</groupId>
<artifactId>javax.servlet-api</artifactId>
<version>3.1.0</version>
</dependency>
<dependency>
<groupId>org.springframework</groupId>
<artifactId>spring-core</artifactId>
<version>${spring.version}</version>
</dependency>
<dependency>
<groupId>org.aspectj</groupId>
<artifactId>aspectjweaver</artifactId>
</dependency>
<dependency>
<groupId>org.springframework</groupId>
<artifactId>spring-aop</artifactId>
<version>${spring.version}</version>
</dependency>
<dependency>
<groupId>org.springframework</groupId>
<artifactId>spring-web</artifactId>
<version>${spring.version}</version>
</dependency>
<dependency>
<groupId>org.springframework</groupId>
<artifactId>spring-webmvc</artifactId>
<version>${spring.version}</version>
</dependency>
<dependency>
<groupId>org.eclipse.jetty.aggregate</groupId>
<artifactId>jetty-all</artifactId>
<version>9.2.19.v20160908</version>
</dependency>
</dependencies>
<build>
<finalName>web-mvc</finalName>
<plugins>
<plugin>
<groupId>org.eclipse.jetty</groupId>
<artifactId>jetty-maven-plugin</artifactId>
<version>9.4.12.RC2</version>
<configuration>
<httpConnector>
<port>8080</port>
</httpConnector>
</configuration>
</plugin>
</plugins>
</build>
|
2. filter声明
创建一个filter,得首先告诉spring说,我这有个filter,你得把它用起来;使用java config的方式创建应用,干掉xml文件,我们知道Servlet容器会扫描AbstractDispatcherServletInitializer的实现类
所以我们的filter声明也放在这里
1
2
3
4
5
6
7
8
9
10
11
12
13
14
15
16
17
18
19
20
21
22
23
24
25
26
27
28
29
| public class MyWebApplicationInitializer extends AbstractDispatcherServletInitializer {
@Override
protected WebApplicationContext createRootApplicationContext() {
return null;
}
@Override
protected WebApplicationContext createServletApplicationContext() {
AnnotationConfigWebApplicationContext applicationContext = new AnnotationConfigWebApplicationContext();
applicationContext.register(RootConfig.class);
applicationContext.register(WebConfig.class);
System.out.println("-------------------");
return applicationContext;
}
@Override
protected String[] getServletMappings() {
return new String[]{"/*"};
}
@Override
protected Filter[] getServletFilters() {
return new Filter[]{new CharacterEncodingFilter("UTF-8", true), new MyCorsFilter()};
}
}
|
看上面最后一个方法,返回当前支持的fitler数组,其中 MyCorsFilter 就是我们自定义的fitler
3. Filter实现
自定义一个filter,需要实现Filter接口,其中有三个方法,主要的是第二个
1
2
3
4
5
6
7
8
9
10
11
12
13
14
15
16
17
18
19
20
21
22
23
24
25
26
27
28
29
30
31
32
33
34
35
|
@Slf4j
public class MyCorsFilter implements Filter {
@Override
public void init(FilterConfig filterConfig) throws ServletException {
}
@Override
public void doFilter(ServletRequest servletRequest, ServletResponse servletResponse, FilterChain filterChain)
throws IOException, ServletException {
try {
HttpServletRequest request = (HttpServletRequest) servletRequest;
HttpServletResponse response = (HttpServletResponse) servletResponse;
if ("/hello".equals(request.getRequestURI())) {
response.setHeader("Access-Control-Allow-Origin", request.getHeader("origin"));
response.setHeader("Access-Control-Allow-Methods", "*");
response.setHeader("Access-Control-Allow-Credentials", "true");
}
} finally {
filterChain.doFilter(servletRequest, servletResponse);
}
}
@Override
public void destroy() {
}
}
|
上面的doFilter方法就是我们重点观察目标,三个参数,注意第三个
- 执行
filterChain.doFilter(servletRequest, servletResponse) 表示会继续将请求执行下去;若不执行这一句,表示这一次的http请求到此为止了,后面的走不下去了
4. 测试
创建一个rest接口,用来测试下我们的filter是否生效
1
2
3
4
5
6
7
8
9
10
11
12
13
14
15
16
17
| @RestController
public class HelloRest {
@Autowired
private PrintServer printServer;
@GetMapping(path = {"hello", "welcome"}, produces = "text/html;charset=UTF-8")
public String sayHello(HttpServletRequest request) {
printServer.print();
return "hello, " + request.getParameter("name");
}
@GetMapping({"/", ""})
public String index() {
return UUID.randomUUID().toString();
}
}
|
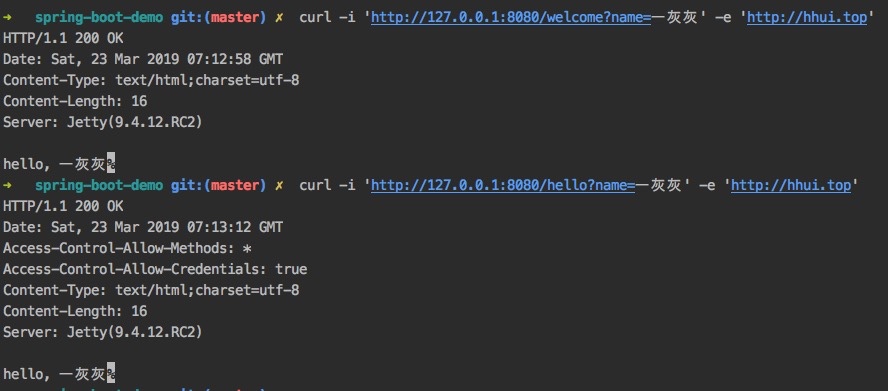
启动web之后,观察下访问 hello 与 welcome 的返回头
5. 其他
相关博文
II. 其他
- 系列博文
web系列:
mvc应用搭建篇:
0. 项目
1. 一灰灰Blog
一灰灰的个人博客,记录所有学习和工作中的博文,欢迎大家前去逛逛
2. 声明
尽信书则不如,以上内容,纯属一家之言,因个人能力有限,难免有疏漏和错误之处,如发现bug或者有更好的建议,欢迎批评指正,不吝感激
3. 扫描关注
一灰灰blog

知识星球
打赏
如果觉得我的文章对您有帮助,请随意打赏。

微信打赏

支付宝打赏