作为一个常年提供各种Http接口的后端而言,如何获取请求参数可以说是一项基本技能了,本篇为《190824-SpringBoot系列教程web篇之Get请求参数解析姿势汇总 》之后的第二篇,对于POST请求方式下,又可以怎样获取请求参数呢
本篇主要内容包括以下几种姿势
@RequestBody json格式
RequestEntity
MultipartFile 文件上传
I. 环境搭建 首先得搭建一个web应用才有可能继续后续的测试,借助SpringBoot搭建一个web应用属于比较简单的活;
创建一个maven项目,pom文件如下
1 2 3 4 5 6 7 8 9 10 11 12 13 14 15 16 17 18 19 20 21 22 23 24 25 26 27 28 29 30 31 32 33 34 35 36 37 38 39 40 41 <parent > <groupId > org.springframework.boot</groupId > <artifactId > spring-boot-starter-parent</artifactId > <version > 2.1.7</version > <relativePath /> </parent > <properties > <project.build.sourceEncoding > UTF-8</project.build.sourceEncoding > <project.reporting.outputEncoding > UTF-8</project.reporting.outputEncoding > <spring-cloud.version > Finchley.RELEASE</spring-cloud.version > <java.version > 1.8</java.version > </properties > <dependencies > <dependency > <groupId > org.springframework.boot</groupId > <artifactId > spring-boot-starter-web</artifactId > </dependency > </dependencies > <build > <pluginManagement > <plugins > <plugin > <groupId > org.springframework.boot</groupId > <artifactId > spring-boot-maven-plugin</artifactId > </plugin > </plugins > </pluginManagement > </build > <repositories > <repository > <id > spring-milestones</id > <name > Spring Milestones</name > <url > https://repo.spring.io/milestone</url > <snapshots > <enabled > false</enabled > </snapshots > </repository > </repositories >
添加项目启动类Application.cass
1
2
3
4
5
6
@SpringBootApplication public class Application { public static void main (String[] args) { SpringApplication.run(Application.class); } }
在演示请求参数的解析实例中,我们使用终端的curl命令来发起http请求(主要原因是截图上传太麻烦,还是终端的文本输出比较方便;缺点是不太直观)
II. POST请求参数解析 接下来我们正式进入参数解析的妖娆姿势篇,会介绍一下常见的一些case(并不能说包含了所有的使用case)
下面所有的方法都放在 ParamPostRest 这个Controller中
1
2
3
4
@RestController @RequestMapping(path = "post") public class ParamPostRest {}
在正式介绍之前,强烈推荐看一下《190824-SpringBoot系列教程web篇之Get请求参数解析姿势汇总 》, 因为get传参的姿势,在post参数解析中同样适用,下面的内容并不会再次详细介绍
1. HttpServletRequest 首先看一下最基本的使用case,和get请求里的case一样,我们先开一个接口
1
2
3
4
@PostMapping(path = "req") public String requestParam (HttpServletRequest req) { return JSONObject.toJSONString(req.getParameterMap()); }
我们测试下两种post请求下,会出现怎样的结果
1 2 3 4 5 6 7 8 ➜ ~ curl 'http://127.0.0.1:8080/post/req' -X POST -d 'name=yihui&age=18' {"name" :["yihui" ],"age" :["18" ]}% ➜ ~ curl 'http://127.0.0.1:8080/post/req' -X POST -H 'content-type:application/json;charset:UTF-8' -d '{"name": "yihui", "age": 20}' {}%
从上面的case中可以知道,通过传统的表达方式提交的数据时,获取参数和get获取参数使用姿势一样;然而当然传入的是json串格式的数据时,直接通过javax.servlet.ServletRequest#getParameter获取不到对应的参数
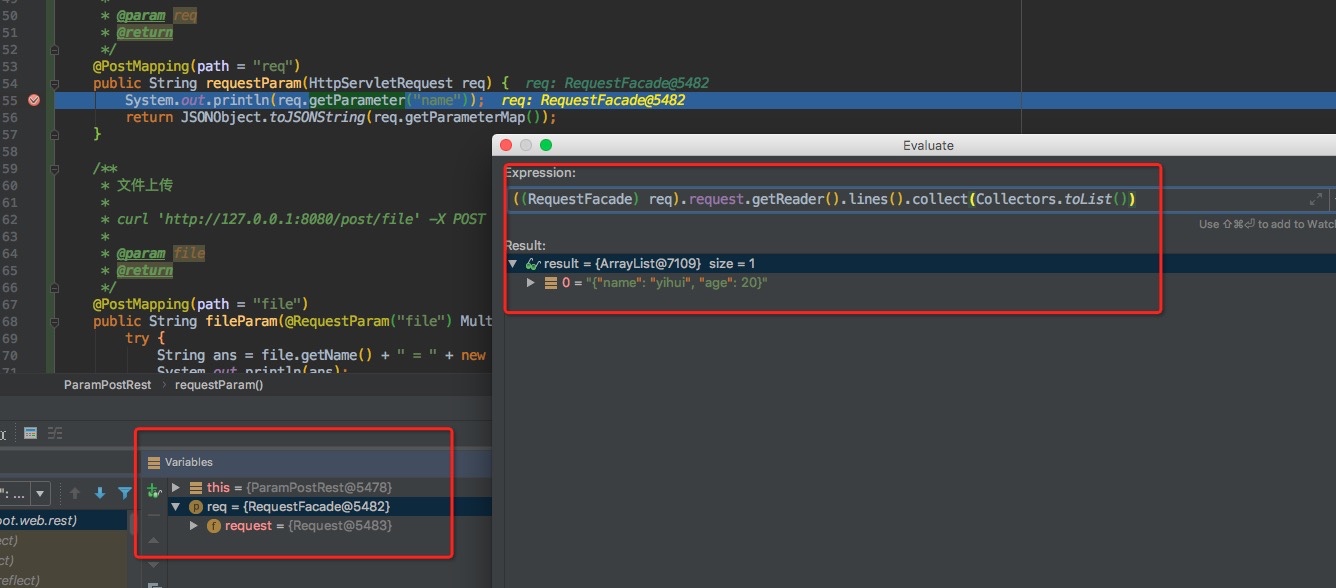
我们通过debug,来看一下在传json串数据的时候,如果我们要获取数据,可以怎么做
上面截图演示了我们从请求的InputStream中获取post参数;所以再实际使用的时候需要注意,流中的数据只能读一次,读完了就没了; 这个和我们使用GET传参是有很大的差别的
注意:如果您有一个打印请求参数日志的切面,在获取post传的参数时需要注意,是不是把流的数据读了,导致业务中无法获取到正确的数据!!!
2. RequestBody 上面说到传json串数据时,后端直接通过HttpServletRequest获取数据不太方便,那么有更优雅的使用姿势么?下面我们看一下@RequestBody注解的使用
1
2
3
4
5
6
7
8
9
10
11
12
13
14
15
@Data public class BaseReqDO implements Serializable { private static final long serialVersionUID = 8706843673978981262L ; private String name; private Integer age; private List<Integer> uIds; } @PostMapping(path = "body") public String bodyParam (@RequestBody BaseReqDO req) { return req == null ? "null" : req.toString(); }
只需要在参数中添加@RequestBody注解即可,然后这个接口就支持json串的POST提交了
1 2 3 4 5 6 7 ➜ ~ curl 'http://127.0.0.1:8080/post/body' -X POST -H 'content-type:application/json;charset:UTF-8' -d '{"name": "yihui", "age": 20}' BaseReqDO(name=yihui, age=20, uIds=null)% ➜ ~ curl 'http://127.0.0.1:8080/post/body' -X POST -d 'name=yihui&age=20' {"timestamp" :1566987651551,"status" :415,"error" :"Unsupported Media Type" ,"message" :"Content type 'application/x-www-form-urlencoded;charset=UTF-8' not supported" ,"path" :"/post/body" }%
说明:使用@RequestBody注解之后,可解析提交的json串;但不再支持表单提交参数方式(application/x-www-form-urlencoded)
3. RequestEntity 使用RequestEntity来解析参数,可能并不太常见,它用来解析json串提交的参数也比较合适,使用姿势也比较简单
1
2
3
4
@PostMapping(path = "entity") public String entityParam (RequestEntity requestEntity) { return Objects.requireNonNull(requestEntity.getBody()).toString(); }
使用case如下
1 2 3 4 5 6 7 ➜ ~ curl 'http://127.0.0.1:8080/post/entity' -X POST -H 'content-type:application/json;charset:UTF-8' -d '{"name": "yihui", "age": 20}' {name=yihui, age=20}% ➜ ~ curl 'http://127.0.0.1:8080/post/entity' -X POST -d 'name=yihui&age=19' {"timestamp" :1566988137298,"status" :415,"error" :"Unsupported Media Type" ,"message" :"Content type 'application/x-www-form-urlencoded;charset=UTF-8' not supported" ,"path" :"/post/entity" }%
4. MultipartFile 文件上传 文件上传也是一个比较常见的,支持起来也比较简单,有两种方式,一个是使用MultipartHttpServletRequest参数来获取上传的文件;一个是借助 @RequestParam注解
1
2
3
4
5
6
7
8
9
10
11
12
13
14
15
16
17
18
19
20
21
22
23
24
25
26
27
28
29
30
private String getMsg (MultipartFile file) { String ans = null ; try { ans = file.getName() + " = " + new String (file.getBytes(), "UTF-8" ); } catch (IOException e) { e.printStackTrace(); return e.getMessage(); } System.out.println(ans); return ans; } @PostMapping(path = "file") public String fileParam (@RequestParam("file") MultipartFile file) { return getMsg(file); } @PostMapping(path = "file2") public String fileParam2 (MultipartHttpServletRequest request) { MultipartFile file = request.getFile("file" ); return getMsg(file); }
测试case如下
1 2 3 4 5 6 7 8 9 10 ➜ ~ vim hello.txt hello, this is yhh's spring test! # 使用curl -F 实现文件上传,注意使用姿势 ➜ ~ curl ' http://127.0.0.1:8080/post/file' -F ' file=@hello.txt' file = hello, this is yhh' s spring test !➜ ~ curl 'http://127.0.0.1:8080/post/file2' -F 'file=@hello.txt' file = hello, this is yhh's spring test!
5. 其他 上面介绍的几种有别于GET篇中的请求姿势,请注意GET请求参数的解析方式,在POST请求中,可能也是适用的,为什么说可能?因为在post请求中,不同的content-type,对参数的解析影响还是有的;
需要注意的是,对于传统的表单提交(application/x-www-form-urlencoded)方式,post的参数解析依然可以使用
@RequsetParam
POJO(BEAN的解析方式)
@PathVariable参数解析
方法参数解析
II. 其他 0. 项目&相关博文
1. 一灰灰Blog 尽信书则不如,以上内容,纯属一家之言,因个人能力有限,难免有疏漏和错误之处,如发现bug或者有更好的建议,欢迎批评指正,不吝感激
下面一灰灰的个人博客,记录所有学习和工作中的博文,欢迎大家前去逛逛
打赏
如果觉得我的文章对您有帮助,请随意打赏。
微信打赏
支付宝打赏