虽然在实际的项目中,借助RestTemplate来实现文件上传的机会不多(比如我已经开webclient的新坑了,才发现忘了这货…),但是这个知识点也还是有必要了解一下的,本文将简单介绍一下单个文件上传,多个文件上传的使用姿势
I. 项目搭建
本项目基于SpringBoot 2.2.1.RELEASE + maven 3.5.3 + idea进行开发
1. pom依赖
核心pom依赖如下
1
2
3
4
| <dependency>
<groupId>org.springframework.boot</groupId>
<artifactId>spring-boot-starter-web</artifactId>
</dependency>
|
2. Rest服务
提供两个简单的上传文件的接口,下面给出两种不一样的写法,效果差不多
1
2
3
4
5
6
7
8
9
10
11
12
13
14
15
16
17
18
19
20
21
22
|
@PostMapping(path = "upload")
public String upload(@RequestPart(name = "data") MultipartFile file, String name) throws IOException {
String ans = new String(file.getBytes(), "utf-8") + "|" + name;
return ans;
}
@PostMapping(path = "upload2")
public String upload(MultipartHttpServletRequest request) throws IOException {
List<MultipartFile> files = request.getFiles("data");
List<String> ans = new ArrayList<>();
for (MultipartFile file : files) {
ans.add(new String(file.getBytes(), "utf-8"));
}
return JSON.toJSONString(ans);
}
|
3. 上传文件
在Resource资源目录下,新建两个用于测试上传的文本文件,内容分别如下
文件1 test.txt:
文件2 test2.txt:
简单设置一下日志格式,在application.yml文件中
1
2
3
| logging:
pattern:
console: (%msg%n%n){blue}
|
II. 项目实现
文件上传,依然是走的POST请求,所以基本操作知识和前面的POST差不多,唯一的区别在于传参
1. 文件上传
文件上传两个核心步骤
最基础的单文件上传姿势实例如下,主要是借助FileSystemResource来获取文件并上传
1
2
3
4
5
6
7
8
9
10
11
12
13
14
15
16
17
18
19
| RestTemplate restTemplate = new RestTemplate();
HttpHeaders headers = new HttpHeaders();
headers.setContentType(MediaType.MULTIPART_FORM_DATA);
FileSystemResource fileSystemResource =
new FileSystemResource(this.getClass().getClassLoader().getResource("test.txt").getFile());
MultiValueMap<String, Object> form = new LinkedMultiValueMap<>();
form.add("data", fileSystemResource);
form.add("name", "哒哒哒");
HttpEntity<MultiValueMap<String, Object>> files = new HttpEntity<>(form, headers);
String ans = restTemplate.postForObject("http://127.0.0.1:8080/upload", files, String.class);
log.info("upload fileResource return: {}", ans);
|
当需要后端发起上传文件时,一般来讲是更多的情况下是上传二进制(or流),不太会是文件上传,所以更常见的是InputStreamResource的使用姿势
1
2
3
4
5
6
7
8
9
10
11
12
13
14
15
16
17
18
| InputStream stream = this.getClass().getClassLoader().getResourceAsStream("test.txt");
InputStreamResource inputStreamResource = new InputStreamResource(stream) {
@Override
public long contentLength() throws IOException {
return stream.available();
}
@Override
public String getFilename() {
return "test.txt";
}
};
form.clear();
form.add("data", inputStreamResource);
files = new HttpEntity<>(form, headers);
ans = restTemplate.postForObject("http://127.0.0.1:8080/upload", files, String.class);
log.info("upload streamResource return: {}", ans);
|
重点注意
InputStreamResource 重写了contentLength(), getFilename()方法,去掉这个就没法正常的上传文件了
当然除了InputStreamResource之外,ByteArrayResource也是一个比较好的选择
1
2
3
4
5
6
7
8
9
10
11
| ByteArrayResource byteArrayResource = new ByteArrayResource("hello 一灰灰😝".getBytes()) {
@Override
public String getFilename() {
return "test.txt";
}
};
form.clear();
form.add("data", byteArrayResource);
files = new HttpEntity<>(form, headers);
ans = restTemplate.postForObject("http://127.0.0.1:8080/upload", files, String.class);
log.info("upload bytesResource return: {}", ans);
|
重点注意
ByteArrayResource重写了getFilename()方法,感兴趣的小伙伴可以测试一下没有它的情况
2. 多文件上传
上面介绍的是单文件上传,当然我们也会出现一次上传多个文件的情况,使用姿势和前面基本上一样,无非是传参的时候多传两个而已
1
2
3
4
5
6
7
8
9
10
11
12
13
|
FileSystemResource f1 =
new FileSystemResource(this.getClass().getClassLoader().getResource("test.txt").getFile());
FileSystemResource f2 =
new FileSystemResource(this.getClass().getClassLoader().getResource("test2.txt").getFile());
form.clear();
form.add("data", f1);
form.add("data", f2);
form.add("name", "多传");
files = new HttpEntity<>(form, headers);
ans = restTemplate.postForObject("http://127.0.0.1:8080/upload2", files, String.class);
log.info("multi upload return: {}", ans);
|
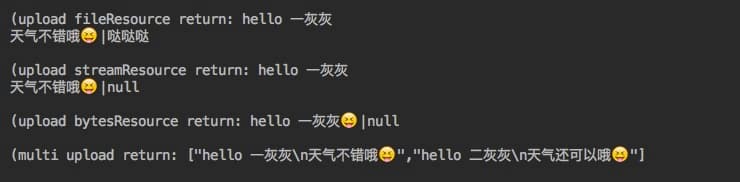
3. 输出结果
II. 其他
0. 项目&系列博文
博文
源码
1. 一灰灰Blog
尽信书则不如,以上内容,纯属一家之言,因个人能力有限,难免有疏漏和错误之处,如发现bug或者有更好的建议,欢迎批评指正,不吝感激
下面一灰灰的个人博客,记录所有学习和工作中的博文,欢迎大家前去逛逛

打赏
如果觉得我的文章对您有帮助,请随意打赏。

微信打赏

支付宝打赏