前面一篇介绍了Jooq的记录新增,除了利用自动生成的代码来保存数据之外,也可以借助DSL.table() + DSL.field()来实现类sql的写法;本文将介绍curd中的删除和更新的用法
I. 项目搭建 本项目借助SpringBoot 2.2.1.RELEASE + maven 3.5.3 + IDEA进行开发
1. 项目依赖 关于如何创建一个SpringBoot的项目工程,不再本文的描述范围内,如有兴趣可以到文末的个人站点获取
在这个示例工程中,我们的选用h2dabase作为数据库(方便有兴趣的小伙伴直接获取工程源码之后,直接测试体验),因此对应的pom核心依赖如下
1 2 3 4 5 6 7 8 9 10 11 12 13 14 <dependencies > <dependency > <groupId > org.springframework.boot</groupId > <artifactId > spring-boot-starter-web</artifactId > </dependency > <dependency > <groupId > org.springframework.boot</groupId > <artifactId > spring-boot-starter-jooq</artifactId > </dependency > <dependency > <groupId > com.h2database</groupId > <artifactId > h2</artifactId > </dependency > </dependencies >
2. 数据库初始化 我们借助jooq-codegen-maven插件来自动生成数据库相关的代码,对这一段逻辑感兴趣的小伙伴可以参考博文:【DB系列】Jooq代码自动生成
后文中使用的表结构如下
1
2
3
4
5
6
7
8
9
10
11
12
13
14
15
16
DROP TABLE IF EXISTS poet;CREATE TABLE poet ( `id` int NOT NULL , `name` varchar (20 ) NOT NULL default '' , CONSTRAINT pk_t_poet PRIMARY KEY (ID) ); DROP TABLE IF EXISTS poetry;CREATE TABLE poetry ( `id` int NOT NULL , `poet_id` int NOT NULL default '0' , `title` varchar (128 ) not null default '' , `content` varchar (128 ) not null default '' , CONSTRAINT pk_t_poetry PRIMARY KEY (ID) );
3. 配置文件 h2database的连接配置如 application.properties
1
2
3
4
5
6
7
8
9
10
11
12
13
14
15
16
17
18
19
20
21
22
23
#Database Configuration spring.datasource.url=jdbc:h2:~/h2-jooq-poet spring.datasource.username=test spring.datasource.password= spring.datasource.driverClassName=org.h2.Driver #jOOQ Configuration spring.jooq.sql-dialect=H2 spring.datasource.initialization-mode=never spring.datasource.continueOnError=true ##h2 web console设置 spring.datasource.platform=h2 #进行该配置后,h2 web consloe就可以在远程访问了。否则只能在本机访问。 spring.h2.console.settings.web-allow-others=true #进行该配置,你就可以通过YOUR_URL/h2访问h2 web consloe spring.h2.console.path=/h2 #进行该配置,程序开启时就会启动h2 web consloe spring.h2.console.enabled=true
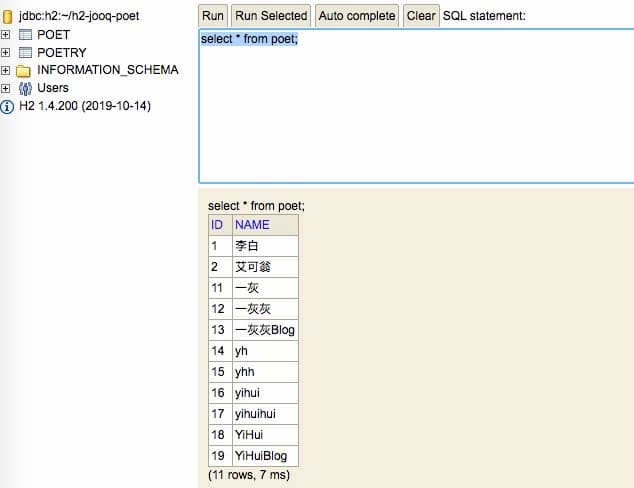
4. 数据准备 后文中的测试数据,主要借助的是前面一篇新增的记录,db中记录如下
II. 记录更新 1. 类sql方式更新 下面这种链式写法和sql极为相似
1
2
3
4
5
6
7
8
9
private static final PoetTB table = PoetTB.POET;@Autowired private DSLContext dsl;private boolean updateName (int id, String name) { return dsl.update(table).set(table.NAME, name).where(table.ID.eq(id)).execute() > 0 ; }
2. 更新计算 上面的更新方式属于最基本的直接设置,某些场景下我们可能需要借助之前的column value,如下concat方法的更新方式,注意这个方法有Field提供
1
2
3
4
5
private boolean updateName2 (int id, String name) { return dsl.update(table).set(table.NAME, table.NAME.concat(name)).where(table.ID.eq(id)).execute() > 0 ; }
3. UpdateQuery更新 除了上面的链式更新方式,还可以借助UpdateQuery来处理
1
2
3
4
5
6
7
8
9
10
private boolean updateName3 (int id, String name) { UpdateQuery updateQuery = dsl.updateQuery(table); updateQuery.addValue(table.NAME, name); updateQuery.addConditions(table.ID.eq(id)); return updateQuery.execute() > 0 ; }
4. Entity更新 直接借助代码自动生成的Record类,本文中对应的是PO结尾的类
1 2 3 4 5 6 7 8 9 10 11 12 13 14 private boolean updateName4 (int id, String name) { PoetPO poetPO = dsl.newRecord(table); poetPO.setId(id); poetPO.setName(name); return poetPO.update() > 0 ; }
5. executeUpdate更新 同样是借助Record类,与上面的区别在于这个实体类直接new出来,借助dsl.executeUpdate执行更新
1
2
3
4
5
private boolean updateName5 (int id, String name) { PoetPO po = new PoetPO (); po.setName(name); return dsl.executeUpdate(po, table.ID.eq(id)) > 0 ; }
6. 批量更新 请注意这里说的批量更新不是指一条sql更新多条record记录,更像是多个更新sql的一次提交执行
下面主要是借助dsl.batchUpdate来实现
1 2 3 4 5 6 7 8 9 10 11 12 13 14 15 16 17 18 19 private boolean batchUpdate (List<PoetBO> list) { List<PoetPO> poList = list.stream().map(this ::bo2po).collect(Collectors.toList()); int [] ans = dsl.batchUpdate(poList).execute(); System.out.println(JSONObject.toJSONString(ans)); return true ; } private PoetPO bo2po (PoetBO bo) { PoetPO po = dsl.newRecord(table); po.setId(bo.getId()); po.setName(bo.getName()); return po; }
III. 记录删除 在实际的业务开发中,一般不建议直接删除记录,最好是通过一个column来标记逻辑删除,当然我们下面介绍的依然是物理删除…
1. 类sql写法 1 2 3 4 5 6 7 8 9 private boolean remove (int id) { return dsl.delete(table).where(table.ID.eq(id)).execute() > 0 ; }
2. Entity删除 直接借助自动生成的实体类来执行删除
1
2
3
4
5
private boolean remove2 (int id) { PoetPO po = dsl.newRecord(table); po.setId(id); return po.delete() > 0 ; }
3. dsl.executeDelete 借助dsl.executeDelete来删除实体类,与上面的区别在于这个实体类是直接new出来的
1
2
3
4
5
private boolean remove3 (int id) { PoetPO po = new PoetPO (); po.setId(id); return dsl.executeDelete(po) > 0 ; }
4. deleteQuery 1 2 3 4 5 private boolean remove4 (int id) { DeleteQuery query = dsl.deleteQuery(table); query.addConditions(table.ID.ge(id)); return query.execute() > 0 ; }
II. 其他 0. 项目 系列博文
项目源码
1. 一灰灰Blog 尽信书则不如,以上内容,纯属一家之言,因个人能力有限,难免有疏漏和错误之处,如发现bug或者有更好的建议,欢迎批评指正,不吝感激
下面一灰灰的个人博客,记录所有学习和工作中的博文,欢迎大家前去逛逛
打赏
如果觉得我的文章对您有帮助,请随意打赏。
微信打赏
支付宝打赏