上一篇博文介绍JdbcTemplate配置多数据源的使用姿势,在我们实际的项目开发中,使用mybatis来操作数据库的可能还是非常多的,本文简单的介绍一下mybatis中,多数据源的使用姿势
通过区分包路径配合配置文件指定不同包下对应不同数据源的实现方式
I. 环境准备 1. 数据库相关 以mysql为例进行演示说明,因为需要多数据源,一个最简单的case就是一个物理库上多个逻辑库,本文是基于本机的mysql进行操作
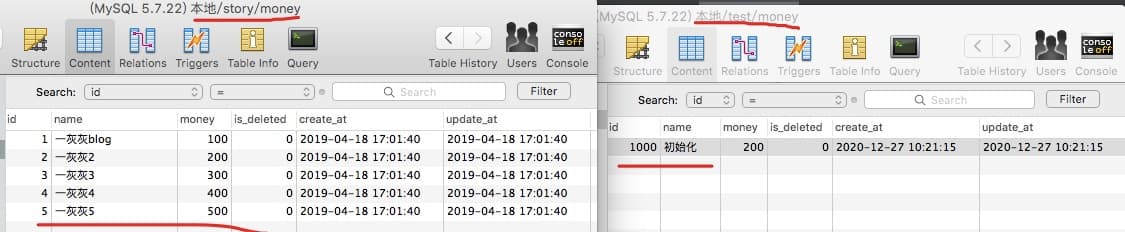
创建数据库test 与 story,两个库下都存在一个表money (同名同结构表,但是数据不同哦)
1
2
3
4
5
6
7
8
9
10
CREATE TABLE `money` ( `id` int (11 ) unsigned NOT NULL AUTO_INCREMENT, `name` varchar (20 ) NOT NULL DEFAULT '' COMMENT '用户名' , `money` int (26 ) NOT NULL DEFAULT '0' COMMENT '钱' , `is_deleted` tinyint(1 ) NOT NULL DEFAULT '0' , `create_at` timestamp NOT NULL DEFAULT CURRENT_TIMESTAMP COMMENT '创建时间' , `update_at` timestamp NOT NULL DEFAULT CURRENT_TIMESTAMP ON UPDATE CURRENT_TIMESTAMP COMMENT '更新时间' , PRIMARY KEY (`id`), KEY `name` (`name`) ) ENGINE= InnoDB AUTO_INCREMENT= 1 DEFAULT CHARSET= utf8mb4;
2. 项目环境 本项目借助SpringBoot 2.2.1.RELEASE + maven 3.5.3 + IDEA进行开发
下面是核心的pom.xml(源码可以再文末获取)
1 2 3 4 5 6 7 8 9 10 11 <dependencies > <dependency > <groupId > org.mybatis.spring.boot</groupId > <artifactId > mybatis-spring-boot-starter</artifactId > <version > 1.3.2</version > </dependency > <dependency > <groupId > mysql</groupId > <artifactId > mysql-connector-java</artifactId > </dependency > </dependencies >
配置文件信息application.yml
1 2 3 4 5 6 7 8 9 10 11 12 13 14 15 16 17 18 19 20 21 22 23 spring: datasource: story: driver-class-name: com.mysql.cj.jdbc.Driver url: jdbc:mysql://127.0.0.1:3306/story?useUnicode=true&characterEncoding=UTF-8&useSSL=false&serverTimezone=Asia/Shanghai username: root password: test: driver-class-name: com.mysql.cj.jdbc.Driver url: jdbc:mysql://127.0.0.1:3306/test?useUnicode=true&characterEncoding=UTF-8&useSSL=false&serverTimezone=Asia/Shanghai username: root password: logging: level: root: info org: springframework: jdbc: core: debug
请注意上面的数据库配置,我们前面介绍的但数据库配置如下,它们层级并不一样,上面的配置需要我们自己额外进行加载解析
1
2
3
4
5
6
spring: datasource: driver-class-name: com.mysql.cj.jdbc.Driver url: jdbc:mysql://127.0.0.1:3306/story?useUnicode=true&characterEncoding=UTF-8&useSSL=false&serverTimezone=Asia/Shanghai username: root password:
II. 包路径指定 这种实现方式和前文中JdbcTemplate的多数据源配置方式很类似,将不同数据源的Mapper文件拆分在不同的包中,然后在配置mybatis数据源及资源文件加载时,分别进行指定
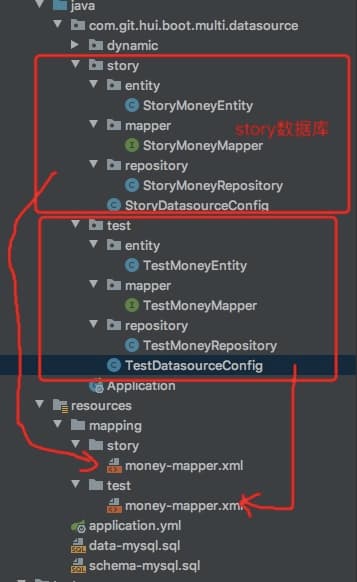
1. 项目结构 本项目中使用story + test两个数据库,我们将不同数据库的mapper.xml以及对应的实体相关类都分别放开,如下图
2. 具体实现 因为两个库中表结构完全一致,所以上图中的 Entity, Mapper, Repository以及xml文件基本都是一致的,下面代码只给出其中一份
数据库实体类StoryMoneyEntity
1
2
3
4
5
6
7
8
9
10
11
12
13
14
@Data public class StoryMoneyEntity { private Integer id; private String name; private Long money; private Integer isDeleted; private Timestamp createAt; private Timestamp updateAt; }
xml对应的Mapper接口StoryMoneyMapper
1
2
3
4
@Mapper public interface StoryMoneyMapper { List<StoryMoneyEntity> findByIds (List<Integer> ids) ; }
mapper对应的xml文件
1
2
3
4
5
6
7
8
9
10
11
12
13
14
15
16
17
18
19
20
21
22
23
24
25
<?xml version="1.0" encoding="UTF-8" ?> <!DOCTYPE mapper PUBLIC "-//mybatis.org//DTD Mapper 3.0//EN" "http://mybatis.org/dtd/mybatis-3-mapper.dtd" > <mapper namespace ="com.git.hui.boot.multi.datasource.story.mapper.StoryMoneyMapper" > <resultMap id ="BaseResultMap" type ="com.git.hui.boot.multi.datasource.story.entity.StoryMoneyEntity" > <id column ="id" property ="id" jdbcType ="INTEGER" /> <result column ="name" property ="name" jdbcType ="VARCHAR" /> <result column ="money" property ="money" jdbcType ="INTEGER" /> <result column ="is_deleted" property ="isDeleted" jdbcType ="TINYINT" /> <result column ="create_at" property ="createAt" jdbcType ="TIMESTAMP" /> <result column ="update_at" property ="updateAt" jdbcType ="TIMESTAMP" /> </resultMap > <sql id ="money_po" > id, `name`, money, is_deleted, create_at, update_at </sql > <select id ="findByIds" parameterType ="list" resultMap ="BaseResultMap" > select <include refid ="money_po" /> from money where id in <foreach item ="id" collection ="list" separator ="," open ="(" close =")" index ="" > #{id} </foreach > </select > </mapper >
数据库操作封装类StoryMoneyRepository
1
2
3
4
5
6
7
8
9
10
@Repository public class StoryMoneyRepository { @Autowired private StoryMoneyMapper storyMoneyMapper; public void query () { List<StoryMoneyEntity> list = storyMoneyMapper.findByIds(Arrays.asList(1 , 1000 )); System.out.println(list); } }
接下来的重点看一下数据源以及Mybatis的相关配置StoryDatasourceConfig
1 2 3 4 5 6 7 8 9 10 11 12 13 14 15 16 17 18 19 20 21 22 23 24 25 26 27 28 29 30 31 32 33 34 35 36 37 38 @Configuration @MapperScan(basePackages = "com.git.hui.boot.multi.datasource.story.mapper", sqlSessionFactoryRef = "storySqlSessionFactory") public class StoryDatasourceConfig { @Primary @Bean(name = "storyDataSourceProperties") @ConfigurationProperties(prefix = "spring.datasource.story") public DataSourceProperties storyDataSourceProperties () { return new DataSourceProperties (); } @Primary @Bean(name = "storyDataSource") public DataSource storyDataSource (@Qualifier("storyDataSourceProperties") DataSourceProperties storyDataSourceProperties) { return storyDataSourceProperties.initializeDataSourceBuilder().build(); } @Primary @Bean("storySqlSessionFactory") public SqlSessionFactory storySqlSessionFactory (DataSource storyDataSource) throws Exception { SqlSessionFactoryBean bean = new SqlSessionFactoryBean (); bean.setDataSource(storyDataSource); bean.setMapperLocations( new PathMatchingResourcePatternResolver ().getResources("classpath*:mapping/story/*.xml" )); return bean.getObject(); } @Primary @Bean("storySqlSessionTemplate") public SqlSessionTemplate storySqlSessionTemplate (SqlSessionFactory storySqlSessionFactory) { return new SqlSessionTemplate (storySqlSessionFactory); } }
另外一个数据源的配置文件则如下
1
2
3
4
5
6
7
8
9
10
11
12
13
14
15
16
17
18
19
20
21
22
23
24
25
26
27
28
29
30
@Configuration @MapperScan(basePackages = "com.git.hui.boot.multi.datasource.test.mapper", sqlSessionFactoryRef = "testSqlSessionFactory") public class TestDatasourceConfig { @Bean(name = "testDataSourceProperties") @ConfigurationProperties(prefix = "spring.datasource.test") public DataSourceProperties testDataSourceProperties () { return new DataSourceProperties (); } @Bean(name = "testDataSource") public DataSource testDataSource (@Qualifier("testDataSourceProperties") DataSourceProperties storyDataSourceProperties) { return storyDataSourceProperties.initializeDataSourceBuilder().build(); } @Bean("testSqlSessionFactory") public SqlSessionFactory testSqlSessionFactory (@Qualifier("testDataSource") DataSource testDataSource) throws Exception { SqlSessionFactoryBean bean = new SqlSessionFactoryBean (); bean.setDataSource(testDataSource); bean.setMapperLocations( new PathMatchingResourcePatternResolver ().getResources("classpath*:mapping/test/*.xml" )); return bean.getObject(); } @Bean("testSqlSessionTemplate") public SqlSessionTemplate testSqlSessionTemplate (@Qualifier("testSqlSessionFactory") SqlSessionFactory testSqlSessionFactory) { return new SqlSessionTemplate (testSqlSessionFactory); } }
3. 测试 简单测试一下是否生效,直接在启动类中,调用
1
2
3
4
5
6
7
8
9
10
11
12
13
@SpringBootApplication public class Application { public Application (StoryMoneyRepository storyMoneyRepository, TestMoneyRepository testMoneyRepository) { storyMoneyRepository.query(); testMoneyRepository.query(); } public static void main (String[] args) { SpringApplication.run(Application.class); } }
输出如下
4. 小结 本文中介绍的多数据源方式,其实和但数据源的mybatis配置方式基本一致,顶多就是SpringBoot中,遵循默认的规范不需要我们显示的创建DataSource实例、SqlSessionFactory实例等
上面介绍的方式,实际上就是显示的声明Mybatis配置过程,多一个数据源,就多一个相关的配置,好处是理解容易,缺点是不灵活,如果我的Mapper类放错位置,可能就会出问题了
那么有其他的方式么,如果我希望将所有的Mapper放在一个包路径下,可以支持么?
下一篇博文,将介绍一种基于AbstractRoutingDataSource + 注解的方式来实现多数据源的支持
II. 其他 0. 项目 相关博文
源码
1. 一灰灰Blog 尽信书则不如,以上内容,纯属一家之言,因个人能力有限,难免有疏漏和错误之处,如发现bug或者有更好的建议,欢迎批评指正,不吝感激
下面一灰灰的个人博客,记录所有学习和工作中的博文,欢迎大家前去逛逛
打赏
如果觉得我的文章对您有帮助,请随意打赏。
微信打赏
支付宝打赏