前面一篇博文介绍了Mybatis多数据源的配置,简单来讲就是一个数据源一个配置指定,不同数据源的Mapper分开指定;本文将介绍另外一种方式,借助AbstractRoutingDataSource来实现动态切换数据源,并通过自定义注解方式 + AOP来实现数据源的指定
I. 环境准备 1. 数据库相关 以mysql为例进行演示说明,因为需要多数据源,一个最简单的case就是一个物理库上多个逻辑库,本文是基于本机的mysql进行操作
创建数据库test 与 story,两个库下都存在一个表money (同名同结构表,但是数据不同哦)
1
2
3
4
5
6
7
8
9
10
CREATE TABLE `money` ( `id` int (11 ) unsigned NOT NULL AUTO_INCREMENT, `name` varchar (20 ) NOT NULL DEFAULT '' COMMENT '用户名' , `money` int (26 ) NOT NULL DEFAULT '0' COMMENT '钱' , `is_deleted` tinyint(1 ) NOT NULL DEFAULT '0' , `create_at` timestamp NOT NULL DEFAULT CURRENT_TIMESTAMP COMMENT '创建时间' , `update_at` timestamp NOT NULL DEFAULT CURRENT_TIMESTAMP ON UPDATE CURRENT_TIMESTAMP COMMENT '更新时间' , PRIMARY KEY (`id`), KEY `name` (`name`) ) ENGINE= InnoDB AUTO_INCREMENT= 1 DEFAULT CHARSET= utf8mb4;
2. 项目环境 本项目借助SpringBoot 2.2.1.RELEASE + maven 3.5.3 + IDEA进行开发
下面是核心的pom.xml(源码可以再文末获取)
1 2 3 4 5 6 7 8 9 10 11 <dependencies > <dependency > <groupId > org.mybatis.spring.boot</groupId > <artifactId > mybatis-spring-boot-starter</artifactId > <version > 1.3.2</version > </dependency > <dependency > <groupId > mysql</groupId > <artifactId > mysql-connector-java</artifactId > </dependency > </dependencies >
配置文件信息application.yml
1 2 3 4 5 6 7 8 9 10 11 12 13 14 15 16 17 18 19 20 21 22 23 24 spring: dynamic: datasource: story: driver-class-name: com.mysql.cj.jdbc.Driver url: jdbc:mysql://127.0.0.1:3306/story?useUnicode=true&characterEncoding=UTF-8&useSSL=false&serverTimezone=Asia/Shanghai username: root password: test: driver-class-name: com.mysql.cj.jdbc.Driver url: jdbc:mysql://127.0.0.1:3306/test?useUnicode=true&characterEncoding=UTF-8&useSSL=false&serverTimezone=Asia/Shanghai username: root password: logging: level: root: info org: springframework: jdbc: core: debug
II. 多数据源配置
强烈建议没有看上一篇博文的小伙伴,先看一下上篇博文 【DB系列】Mybatis多数据源配置与使用
在开始之前,先有必要回顾一下之前Mybatis多数据源配置的主要问题在哪里
多加一个数据源,需要多一份配置
Mapper文件需要分包处理,对开发人员而言这是个潜在的坑
针对上面这个,那我们想实现的目的也很清晰了,解决上面两个问题
1. AbstractRoutingDataSource 实现多数据源的关键,从名字上就可以看出,它就是用来路由具体的数据源的,其核心代码如
1 2 3 4 5 6 7 8 9 10 11 12 13 14 15 16 17 18 protected DataSource determineTargetDataSource () { Assert.notNull(this .resolvedDataSources, "DataSource router not initialized" ); Object lookupKey = this .determineCurrentLookupKey(); DataSource dataSource = (DataSource)this .resolvedDataSources.get(lookupKey); if (dataSource == null && (this .lenientFallback || lookupKey == null )) { dataSource = this .resolvedDefaultDataSource; } if (dataSource == null ) { throw new IllegalStateException ("Cannot determine target DataSource for lookup key [" + lookupKey + "]" ); } else { return dataSource; } } @Nullable protected abstract Object determineCurrentLookupKey () ;
其中determineCurrentLookupKey需要我们自己来实现,到底返回哪个数据源
2. 动态数据源实现 我们创建一个DynamicDataSource继承自上面的抽象类
1
2
3
4
5
6
7
public class DynamicDataSource extends AbstractRoutingDataSource { @Override protected Object determineCurrentLookupKey () { String dataBaseType = DSTypeContainer.getDataBaseType(); return dataBaseType; } }
注意上面的实现方法,怎样决定具体的返回数据源呢?
一个可考虑的方法是,在Mapper文件上添加一个注解@DS,里面指定对应的数据源,然后再执行时,通过它来确定具体需要执行的数据源;
因为上面的实现没有传参,因此我们考虑借助线程上下文的方式来传递信息
1
2
3
4
5
6
7
8
9
10
11
12
13
14
15
16
17
18
19
20
21
22
23
24
25
26
27
28
29
30
31
32
33
34
35
36
public class DSTypeContainer { private static final ThreadLocal<String> TYPE = new ThreadLocal <String>(); public static String defaultType; public static void setDataBaseType (String dataBase) { if (StringUtils.isEmpty(dataBase)) { dataBase = defaultType; } TYPE.set(dataBase); System.err.println("[将当前数据源改为]:" + dataBase); } public static String getDataBaseType () { String database = TYPE.get(); System.err.println("[获取当前数据源的类型为]:" + database); return database; } public static void clearDataBaseType () { TYPE.remove(); } }
3. 注解实现 上面虽然给出了数据源选择的策略,从线程上下文中获取DataBaseType,但是应该怎样向线程上下文中塞这个数据呢?
我们需要支持的方案必然是在Sql执行之前,先拦截它,写入这个DataBaseType,因此我们可以考虑在xxxMapper接口上,定义一个注解,然后拦截它的访问执行,在执行之前获取注解中指定的数据源写入上下文,在执行之后清楚上下文
一个最基础的数据源注解@DS
1
2
3
4
5
6
@Target(ElementType.TYPE) @Retention(RetentionPolicy.RUNTIME) @Inherited public @interface DS { String value () default "" ; }
注解拦截
1
2
3
4
5
6
7
8
9
10
11
12
13
14
15
16
17
18
@Aspect @Component public class DsAspect { @Around("@within(DS)") public Object dsAround (ProceedingJoinPoint proceedingJoinPoint) throws Throwable { DS ds = (DS) proceedingJoinPoint.getSignature().getDeclaringType().getAnnotation(DS.class); try { DSTypeContainer.setDataBaseType(ds == null ? null : ds.value()); return proceedingJoinPoint.proceed(); } finally { DSTypeContainer.clearDataBaseType(); } } }
4. 注册配置 接下来就是比较关键的数据源配置了,我们现在需要注册DynamicDataSource,然后将他提供给SqlSessionFactory,在这里,我们希望解决即便多加数据源也不需要修改配置,所以我们调整了一下数据源的配置结构
1
2
3
4
5
6
7
8
9
10
11
12
13
spring: dynamic: datasource: story: driver-class-name: com.mysql.cj.jdbc.Driver url: jdbc:mysql://127.0.0.1:3306/story?useUnicode=true&characterEncoding=UTF-8&useSSL=false&serverTimezone=Asia/Shanghai username: root password: test: driver-class-name: com.mysql.cj.jdbc.Driver url: jdbc:mysql://127.0.0.1:3306/test?useUnicode=true&characterEncoding=UTF-8&useSSL=false&serverTimezone=Asia/Shanghai username: root password:
然后给出一个加载上面配置的配置类DSProperties
1
2
3
4
5
@Data @ConfigurationProperties(prefix = "spring.dynamic") public class DSProperties { private Map<String, DataSourceProperties> datasource; }
然后我们的AutoConfiguration类的实现方式就相对明确了(建议对比上一篇博文中的配置类)
1
2
3
4
5
6
7
8
9
10
11
12
13
14
15
16
17
18
19
20
21
22
23
24
25
26
27
28
29
30
31
32
@Configuration @EnableConfigurationProperties(DSProperties.class) @MapperScan(basePackages = {"com.git.hui.boot.multi.datasource.mapper"}, sqlSessionFactoryRef = "SqlSessionFactory") public class DynamicDataSourceConfig { @SuppressWarnings("unchecked") @Bean(name = "dynamicDataSource") public DynamicDataSource DataSource (DSProperties dsProperties) { Map targetDataSource = new HashMap <>(8 ); dsProperties.getDatasource().forEach((k, v) -> { targetDataSource.put(k, v.initializeDataSourceBuilder().build()); }); DynamicDataSource dataSource = new DynamicDataSource (); dataSource.setTargetDataSources(targetDataSource); DSTypeContainer.defaultType = (String) targetDataSource.keySet().stream().findFirst().get(); dataSource.setDefaultTargetDataSource(targetDataSource.get(DSTypeContainer.defaultType)); return dataSource; } @Bean(name = "SqlSessionFactory") public SqlSessionFactory test1SqlSessionFactory (@Qualifier("dynamicDataSource") DataSource dynamicDataSource) throws Exception { SqlSessionFactoryBean bean = new SqlSessionFactoryBean (); bean.setDataSource(dynamicDataSource); bean.setMapperLocations( new PathMatchingResourcePatternResolver ().getResources("classpath*:mapping/*/*.xml" )); return bean.getObject(); } }
5. 数据库实体类
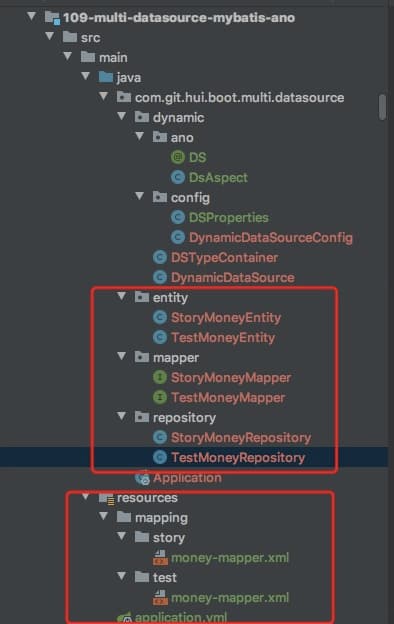
项目结构图
所有前面的东西属于通用配置相关,接下来给出具体的数据库操作相关实体类、Mapper类
数据库实体类StoryMoneyEntity
1
2
3
4
5
6
7
8
9
10
11
12
13
14
@Data public class StoryMoneyEntity { private Integer id; private String name; private Long money; private Integer isDeleted; private Timestamp createAt; private Timestamp updateAt; }
mapper定义接口 StoryMoneyMapper + TestMoneyMapper
1
2
3
4
5
6
7
8
9
10
11
@DS(value = "story") @Mapper public interface StoryMoneyMapper { List<StoryMoneyEntity> findByIds (List<Integer> ids) ; } @DS(value = "test") @Mapper public interface TestMoneyMapper { List<TestMoneyEntity> findByIds (List<Integer> ids) ; }
对应的xml文件
1
2
3
4
5
6
7
8
9
10
11
12
13
14
15
16
17
18
19
20
21
22
23
24
25
26
<?xml version="1.0" encoding="UTF-8" ?> <!DOCTYPE mapper PUBLIC "-//mybatis.org//DTD Mapper 3.0//EN" "http://mybatis.org/dtd/mybatis-3-mapper.dtd" > <mapper namespace ="com.git.hui.boot.multi.datasource.mapper.StoryMoneyMapper" > <resultMap id ="BaseResultMap" type ="com.git.hui.boot.multi.datasource.entity.StoryMoneyEntity" > <id column ="id" property ="id" jdbcType ="INTEGER" /> <result column ="name" property ="name" jdbcType ="VARCHAR" /> <result column ="money" property ="money" jdbcType ="INTEGER" /> <result column ="is_deleted" property ="isDeleted" jdbcType ="TINYINT" /> <result column ="create_at" property ="createAt" jdbcType ="TIMESTAMP" /> <result column ="update_at" property ="updateAt" jdbcType ="TIMESTAMP" /> </resultMap > <sql id ="money_po" > id, `name`, money, is_deleted, create_at, update_at </sql > <select id ="findByIds" parameterType ="list" resultMap ="BaseResultMap" > select <include refid ="money_po" /> from money where id in <foreach item ="id" collection ="list" separator ="," open ="(" close =")" index ="" > #{id} </foreach > </select > </mapper >
数据库操作封装类StoryMoneyRepository + TestMoneyRepository
1
2
3
4
5
6
7
8
9
10
11
12
13
14
15
16
17
18
19
20
21
@Repository public class StoryMoneyRepository { @Autowired private StoryMoneyMapper storyMoneyMapper; public void query () { List<StoryMoneyEntity> list = storyMoneyMapper.findByIds(Arrays.asList(1 , 1000 )); System.out.println(list); } } @Repository public class TestMoneyRepository { @Autowired private TestMoneyMapper testMoneyMapper; public void query () { List<TestMoneyEntity> list = testMoneyMapper.findByIds(Arrays.asList(1 , 1000 )); System.out.println(list); } }
6. 测试 最后简单的测试下,动态数据源切换是否生效
1
2
3
4
5
6
7
8
9
10
11
12
@SpringBootApplication public class Application { public Application (StoryMoneyRepository storyMoneyRepository, TestMoneyRepository testMoneyRepository) { storyMoneyRepository.query(); testMoneyRepository.query(); } public static void main (String[] args) { SpringApplication.run(Application.class); } }
输出日志如下
6.小结 本文主要给出了一种基于AbstractRoutingDataSource + AOP实现动态数据源切换的实现方式,使用了下面三个知识点
AbstractRoutingDataSource实现动态数据源切换自定义@DS注解 + AOP指定Mapper对应的数据源
ConfigurationProperties方式支持添加数据源无需修改配置
II. 其他 0. 项目 相关博文
源码
1. 一灰灰Blog 尽信书则不如,以上内容,纯属一家之言,因个人能力有限,难免有疏漏和错误之处,如发现bug或者有更好的建议,欢迎批评指正,不吝感激
下面一灰灰的个人博客,记录所有学习和工作中的博文,欢迎大家前去逛逛
打赏
如果觉得我的文章对您有帮助,请随意打赏。
微信打赏
支付宝打赏