在我们的日常工作中,我们可能会遇到需要实现双向通讯的场景。为了解决这个问题,常见的实现方案包括短轮询、长轮询、SSE和WebSocket等几种方式。本文将重点介绍如何通过整合WebSocket和STOMP协议来实现双向通讯的方案, 并给出一个应用实例,带你轻松掌握如何基于SpringBoot搭建一个在线聊天系统
I. 基础知识点
1. 相关概念释疑
再开始之前,简单介绍一下文中会出现的几个术语的
WebSocket: WebSocket是一种在单个TCP连接上进行全双工通信的协议。它使得客户端和服务器之间能够实时地进行双向数据传输,而不需要频繁地建立和关闭连接。这种机制可以提高数据传输的效率和性能。
STOMP: Simple Text Oriented Messaging Protocol 是一种简单而灵活的消息传递协议,它是在HTTP之上实现的。STOMP协议定义了一套简单的命令和帧格式,用于在客户端和服务器之间进行消息传递。通过使用STOMP协议,我们可以实现客户端和服务器之间的双向通讯。
注意:stomp协议属于websocket的子协议
2. WebSocket整合STOMP
WebSocket整合STOMP协议实现双向通讯的方案,主要步骤如下:
建立WebSocket连接:客户端通过JavaScript的WebSocket API与服务器建立连接。
发送STOMP帧:在WebSocket连接建立后,客户端和服务器就可以通过发送STOMP帧来进行通信了。STOMP帧是STOMP协议的基本单位,它定义了消息的各种操作,如订阅、发布等。
处理STOMP帧:服务器收到STOMP帧后,会根据帧的类型进行相应的处理。例如,如果收到一个SUBSCRIBE帧,服务器就会为客户端创建一个订阅;如果收到一个SEND帧,服务器就会将消息发送给指定的目的地。
关闭WebSocket连接:当客户端和服务器都完成了通信后,可以通过调用WebSocket API的close方法来关闭连接。
3. SpringBoot整合STOMP流程
SpringBoot对websocket提供了非常友好的封装,对于业务开放而言,可以简单迅速的搭建一个基于STOMP协议的websocket应用工程
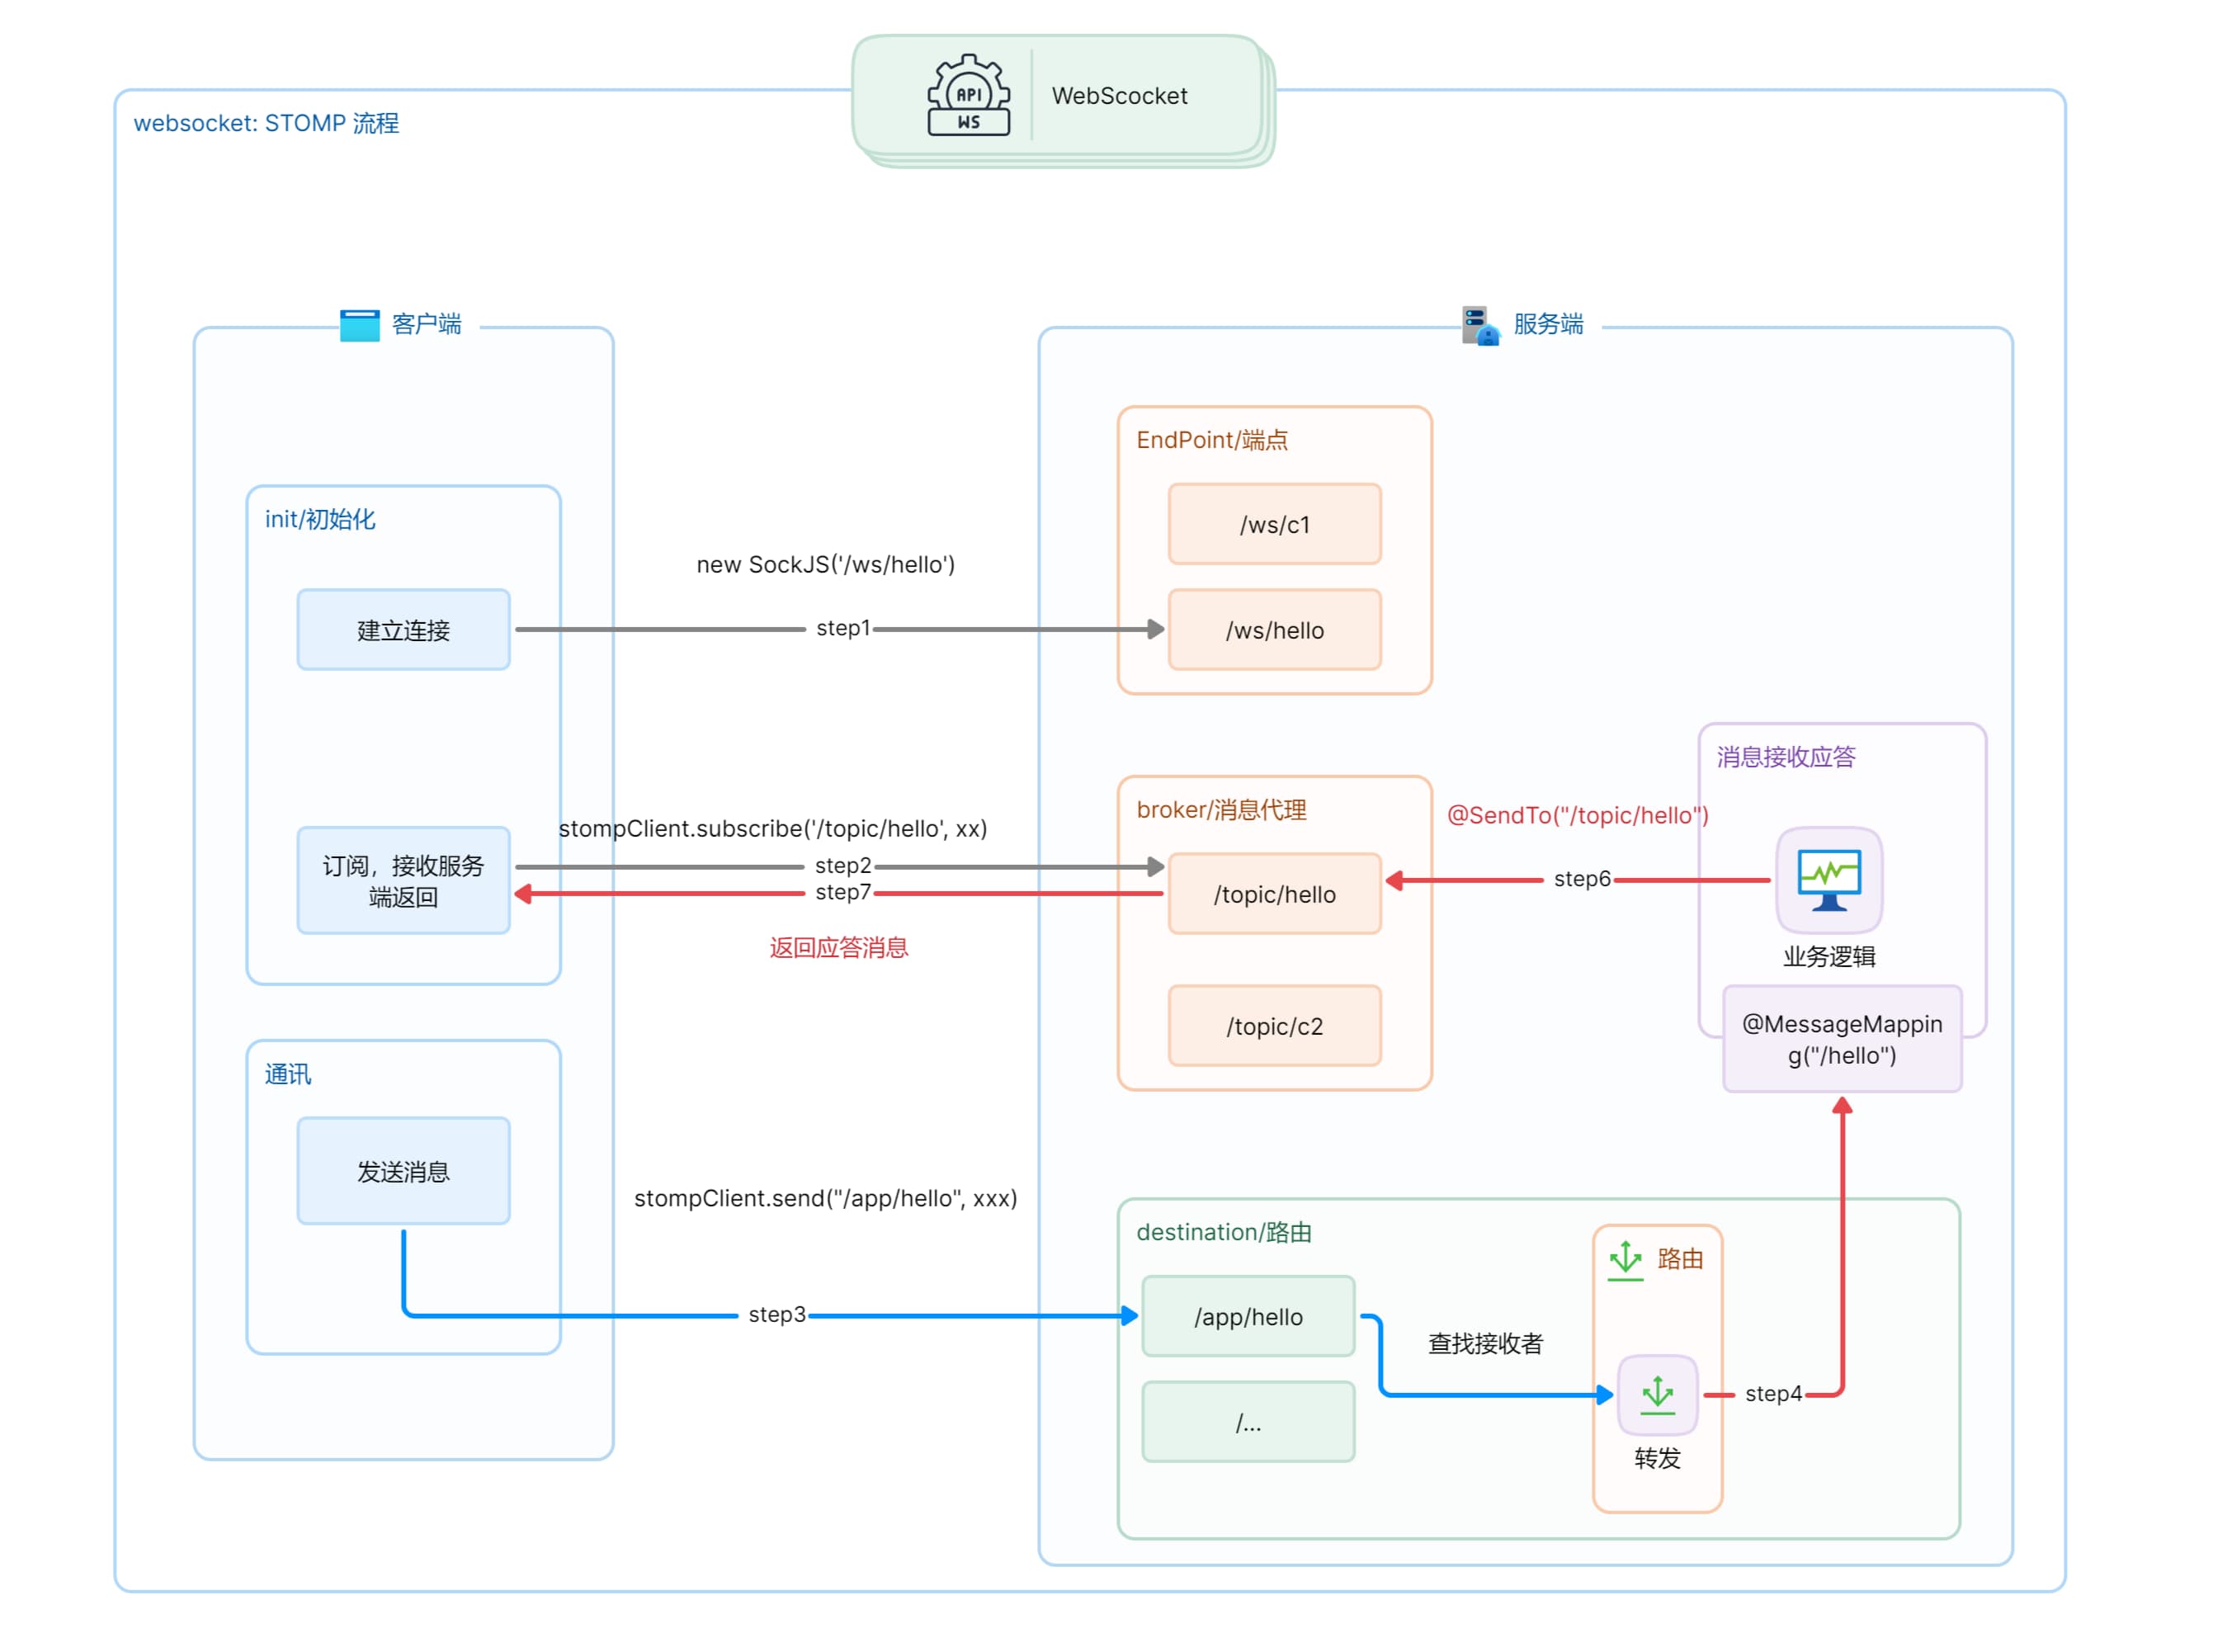
上图展示了STOMP的基本工作流程。
步骤1:初始化
服务端:
- 定义接收建立WebSocket连接的端点EndPoint。
- 配置消息代理Broker,用于前端订阅(subscribe),后端向该Broker写入消息后,订阅了该Broker的前端都会收到相应的消息。
- 配置路由转发规则,将用户发送的信息转发给相应的处理器(类似于
RequestMappingHandlerMapping与@RequestMapping注解,在WebSocket中使用的是Destination + @MessageMapping)。
客户端:
- 与EndPoint建立连接。
- 订阅Broker,注册消息回调。
步骤2:通讯
服务端:
- 主动向Broker写入消息:使用
simpMessagingTemplate。
- 消息应答:使用
@SendTo注解。
客户端:
- 发送消息:调用send(xxxx)方法。
- 消息应答:触发订阅的回调函数。
II. 实例演示
1. 项目配置
首先搭建一个标准的SpringBoot项目工程,相关版本以及依赖如下
本项目借助SpringBoot 2.2.1.RELEASE + maven 3.5.3 + IDEA进行开发
核心依赖 spring-boot-starter-websocket, 其中模板渲染引擎thymeleaf主要是集成前端页面
1
2
3
4
5
6
7
8
9
10
11
| <dependencies>
<dependency>
<groupId>org.springframework.boot</groupId>
<artifactId>spring-boot-starter-websocket</artifactId>
</dependency>
<dependency>
<groupId>org.springframework.boot</groupId>
<artifactId>spring-boot-starter-thymeleaf</artifactId>
</dependency>
</dependencies>
|
2. WebSocket配置
正如前面流程图中介绍的,后端需要先配置一下websocket的相关信息,通过实现配置类WebSocketMessageBrokerConfigurer来定义
1
2
3
4
5
6
7
8
9
10
11
12
13
14
15
16
17
18
19
20
21
22
23
24
25
26
27
28
29
30
31
32
33
| @Configuration
@EnableWebSocketMessageBroker
public class StompConfiguration implements WebSocketMessageBrokerConfigurer {
@Override
public void configureMessageBroker(MessageBrokerRegistry registry) {
registry.enableSimpleBroker("/topic");
registry.setApplicationDestinationPrefixes("/app");
}
@Override
public void registerStompEndpoints(StompEndpointRegistry registry) {
registry.addEndpoint("/ws/hello").withSockJS();
}
}
|
- 定义端点:
registerStompEndpoints()
- 定义客户端与服务端通讯信息:
configureMessageBroker()
- 配置消息代理:
registry.enableSimpleBroker
- 配置消息转发:
registry.setApplicationDestinationPrefixes,转发前缀可以是多个
上面的配置完毕之后,对于客户端而言
- 建立连接的路径是:
/ws/hello
- 订阅消息的路径是:
/topic/xxx
- 接收前端消息的路劲是:
/app/xxx
- 后面的这个xxx,是由
@MessageMapping中的路径来补齐
3. 消息接收应答
1
2
3
4
5
6
7
8
9
10
11
12
13
14
15
16
| @Controller
public class HelloController {
@MessageMapping("/hello")
@SendTo("/topic/hello")
public String sayHello(String content) {
return "resp: " + content + " | " + LocalDateTime.now();
}
}
|
实现一个非常简单的消息应答,接收客户端朝 /app/hello 发送的消息,然后将结果写回到 /topic/hello 对应的Broker,那么订阅了这个broker的客户端,都会收到这个应答消息了
再写一个定时器,由后端定时的向/topic/hello这个Broker中写入消息,模拟后台主动下发消息的场景
1
2
3
4
5
6
7
8
9
10
11
12
13
14
15
16
17
18
19
20
21
22
23
24
| @EnableScheduling
@SpringBootApplication
public class Application {
@Autowired
private SimpMessagingTemplate simpMessagingTemplate;
public static void main(String[] args) {
SpringApplication.run(Application.class);
}
@Scheduled(cron = "0/10 * * * * ?")
public void sc1() throws IOException {
String rspMsg = Thread.currentThread().getName() + " 自动返回 | sc1:" + LocalDateTime.now();
simpMessagingTemplate.convertAndSend("/topic/hello", rspMsg);
}
}
|
4. 前端示例
一个简单基础的html页面
1
2
3
4
5
6
7
8
9
10
11
12
13
14
15
16
17
18
19
20
21
22
23
24
25
26
27
28
29
30
31
32
33
34
35
36
37
38
39
40
41
42
43
44
45
46
47
48
49
50
51
52
| <!DOCTYPE html>
<html lang="zh-CN" xmlns:th="http://www.thymeleaf.org"
xmlns:layout="http://www.ultraq.net.nz/web/thymeleaf/layout">
<head>
<title>Hello WebSocket</title>
<link th:href="@{/main.css}" rel="stylesheet">
<link href="/css/bootstrap.min.css" rel="stylesheet" crossorigin="anonymous">
<script src="/js/jquery.js"></script>
<script src="/js/sockjs.min.js"></script>
<script src="/js/stomp.min.js"></script>
<script src="/index.js"></script>
</head>
<body>
<div id="main-content" class="container">
<div class="row">
<div class="col-md-6">
<form class="form-inline">
<div class="form-group">
<label for="connect">WebSocket 连接:</label>
<button id="connect" class="btn btn-warning" type="submit">Connect</button>
<button id="disconnect" class="btn btn-danger" type="submit" disabled="disabled">Disconnect
</button>
</div>
</form>
</div>
<div class="col-md-6">
<form class="form-inline">
<div class="form-group">
<label for="name">send some message: </label>
<input type="text" id="name" class="form-control" placeholder="message here...">
<button id="send" class="btn btn-dark" type="submit">Send</button>
</div>
</form>
</div>
</div>
<div class="row">
<div class="col-md-12">
<table id="conversation" class="table table-striped">
<thead>
<tr>
<th>Greetings</th>
</tr>
</thead>
<tbody id="greetings">
</tbody>
</table>
</div>
</div>
</div>
</body>
</html>
|
核心的js逻辑,实现websocket连接建立,通讯
1
2
3
4
5
6
7
8
9
10
11
12
13
14
15
16
17
18
19
20
21
22
23
24
25
26
27
28
29
30
31
32
33
34
35
36
37
38
39
40
41
42
43
44
45
46
47
48
49
50
51
52
53
54
55
56
57
58
59
| var stompClient = null;
function setConnected(connected) {
$("#connect").prop("disabled", connected);
$("#disconnect").prop("disabled", !connected);
if (connected) {
$("#conversation").show();
} else {
$("#conversation").hide();
}
$("#greetings").html("");
}
function connect() {
var socket = new SockJS('/ws/hello');
stompClient = Stomp.over(socket);
stompClient.connect({}, function (frame) {
setConnected(true);
console.log('Connected: ' + frame);
stompClient.subscribe('/topic/hello', function (greeting) {
console.log("resp: ", greeting.body)
showGreeting(greeting.body);
});
});
}
function disconnect() {
if (stompClient !== null) {
stompClient.disconnect();
}
setConnected(false);
console.log("Disconnected");
}
function sendName() {
stompClient.send("/app/hello", {}, JSON.stringify({'name': $("#name").val()}));
}
function showGreeting(message) {
$("#greetings").prepend("<tr><td>" + message + "</td></tr>");
}
$(function () {
$("form").on('submit', function (e) {
e.preventDefault();
});
$("#connect").click(function () {
connect();
});
$("#disconnect").click(function () {
disconnect();
});
$("#send").click(function () {
sendName();
});
});
|
注意上面的实现:
- 建立连接
connect()
- 与后端定义的端点建立连接:
new SockJS('/ws/hello');
- 连接建立成功之后,订阅Broker,接收消息回传:
stompClient.subscribe('/topic/hello', 消息应答回调)
- 发送消息
- `stompClient.send(“/app/hello”, xxx)``
- 断开连接
stompClient.disconnect();
5. 演示
到这里,一个完整的基于SpringBoot整合WebSocket与STOMP协议的示例应用已经搭建完成;接下来我们实际启动一下看看效果

上面的动图展示了前端建立连接后,向后端发送信息并接收后端广播的消息的过程。由于两个客户端订阅的是同一个broker,因此后端发送的消息可以被所有客户端接收到。
这种交互方式类似于群组聊天,当一个人发送消息后,其他人都可以收到。
如果我希望通过websocket实现一个消息通知的功能,其中后端发送的消息既有广播的,也有面向个人的,那么应该如何实现呢?
我们下篇博文将进行详细介绍
III. 不能错过的源码和相关知识点
0. 项目
1. 微信公众号: 一灰灰Blog
尽信书则不如,以上内容,纯属一家之言,因个人能力有限,难免有疏漏和错误之处,如发现bug或者有更好的建议,欢迎批评指正,不吝感激
下面一灰灰的个人博客,记录所有学习和工作中的博文,欢迎大家前去逛逛

打赏
如果觉得我的文章对您有帮助,请随意打赏。
微信打赏

支付宝打赏