上面一篇文章介绍了 SpringAI官方提供的 jdbc start来实现持久化对话历史 使用MySql持久化对话历史,官方实现的几个数据库已经很有代表性了,接下来我们将看一下,如果沿用官方的思路,来为h2添加持久化对话历史功能。
一、H2持久化对话历史
1. 创建项目
创建一个SpringAI项目,基本流程同 创建一个SpringAI-Demo工程
2. 添加依赖
在pom.xml中添加关键依赖
1
2
3
4
5
6
7
8
9
10
11
12
13
14
15
16
17
18
19
| <dependencies>
<dependency>
<groupId>org.springframework.boot</groupId>
<artifactId>spring-boot-starter-web</artifactId>
</dependency>
<dependency>
<groupId>org.springframework.ai</groupId>
<artifactId>spring-ai-starter-model-zhipuai</artifactId>
</dependency>
<dependency>
<groupId>org.springframework.ai</groupId>
<artifactId>spring-ai-starter-model-chat-memory-repository-jdbc</artifactId>
</dependency>
<dependency>
<groupId>com.h2database</groupId>
<artifactId>h2</artifactId>
<scope>runtime</scope>
</dependency>
</dependencies>
|
3. 配置数据库连接
在配置文件 application.yml 文件中,指定SpringAI配置 + 数据库连接信息
1
2
3
4
5
6
7
8
9
10
11
12
13
14
15
16
17
18
19
20
21
22
23
24
25
26
27
28
29
30
31
| spring:
datasource:
url: jdbc:h2:file:${user.dir}/advance-projects/A02-memory-jdbc-h2/datas/test-db;DB_CLOSE_DELAY=-1
driver-class-name: org.h2.Driver
username: sa
password:
h2:
console:
enabled: true
ai:
chat:
memory:
repository:
jdbc:
initialize-schema: always
schema: classpath:schema-h2.sql
platform: h2
zhipuai:
api-key: ${zhipuai-api-key}
chat:
options:
model: GLM-4-Flash
logging:
level:
org.springframework.ai.chat.client.advisor.SimpleLoggerAdvisor: debug
|
说明,虽然我们这里使用的是 H2,但是 spring.ai.chat.memory.repository.jdbc.initialize-schema 配置项,还是建议选择 always,因为上面配置的是使用文件来存储db;如果使用内存 jdbc:h2:mem 的方式,则这里可以选择 embedded
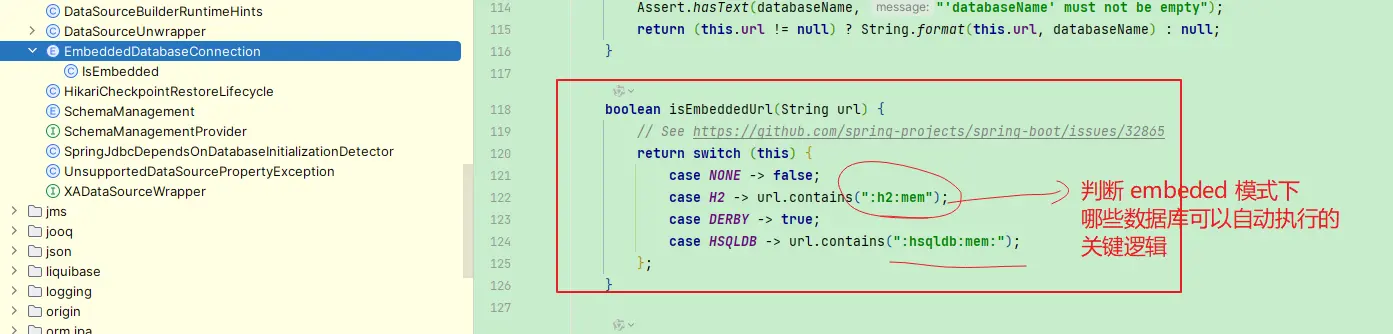
其次就是我们需要指定 schema 文件,这个文件,就是用来创建数据库表结构,这里我们使用 h2 的默认结构,因此这里我们使用 classpath:schema-h2.sql
1
2
3
4
5
6
7
| CREATE TABLE IF NOT EXISTS SPRING_AI_CHAT_MEMORY
(
`conversation_id` VARCHAR(36) NOT NULL,
`content` TEXT NOT NULL,
`type` ENUM ('USER', 'ASSISTANT', 'SYSTEM', 'TOOL') NOT NULL,
`timestamp` TIMESTAMP NOT NULL
);
|
4. 初始化 ChatMemory
因为我们使用的是系统未提供支持的h2,因此无法使用自动注入的ChatMemoryRepository,因为它选择的Dialect是 PostgresChatMemoryRepositoryDialect,无法支持h2的使用场景
我们这里直接使用MysqlChatMemoryRepositoryDialect来作为h2的Dialect(当然也可以自行实现一个Dialect)
1
2
3
4
5
6
7
8
9
10
11
12
13
14
15
| @Configuration
public class MemConfig {
@Bean
public ChatMemory jdbcChatMemory(JdbcTemplate jdbcTemplate) {
ChatMemoryRepository chatMemoryRepository = JdbcChatMemoryRepository.builder()
.jdbcTemplate(jdbcTemplate)
.dialect(new MysqlChatMemoryRepositoryDialect())
.build();
return MessageWindowChatMemory.builder()
.chatMemoryRepository(chatMemoryRepository)
.build();
}
}
|
5. ChatClient 配置
然后通过MessageChatMemoryAdvisor来为ChatClient提供聊天历史能力支撑
1
2
3
4
5
6
7
8
9
10
11
12
|
@RestController
public class ChatController {
    private final ChatClient chatClient;

    public ChatController(ChatModel chatModel, ChatMemory chatMemory) {
        this.chatClient = ChatClient.builder(chatModel)
                .defaultAdvisors(MessageChatMemoryAdvisor.builder(chatMemory).build(),
                        new SimpleLoggerAdvisor())
                .build();
    }
}
|
6. 示例测试
提供一个聊天接口,第一个参数为用户标识,用于区分用户的聊天记录
1
2
3
4
5
6
7
8
9
10
11
12
13
14
15
16
| @RestController
public class ChatController {
@GetMapping("/{user}/chat")
public Object chat(@PathVariable String user, String msg) {
return chatClient.prompt().user(msg)
.advisors(a -> a.param(ChatMemory.CONVERSATION_ID, user))
.call().content();
}
}
|
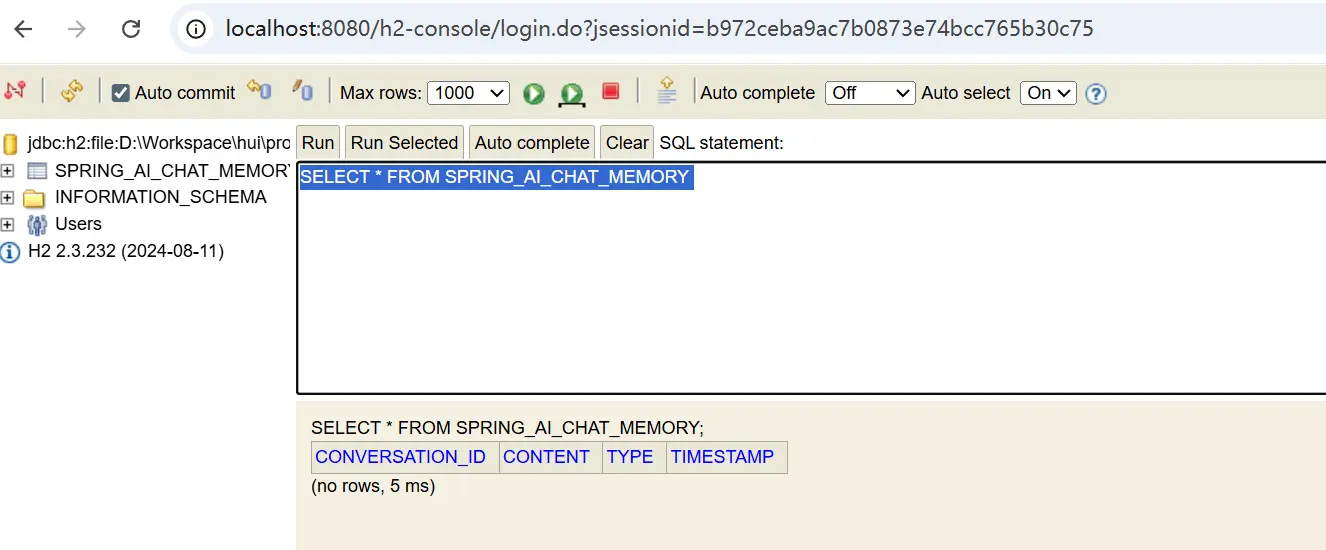
启动成功之后,我们可以在h2-console中看到新增了一个表 SPRING_AI_CHAT_MEMORY
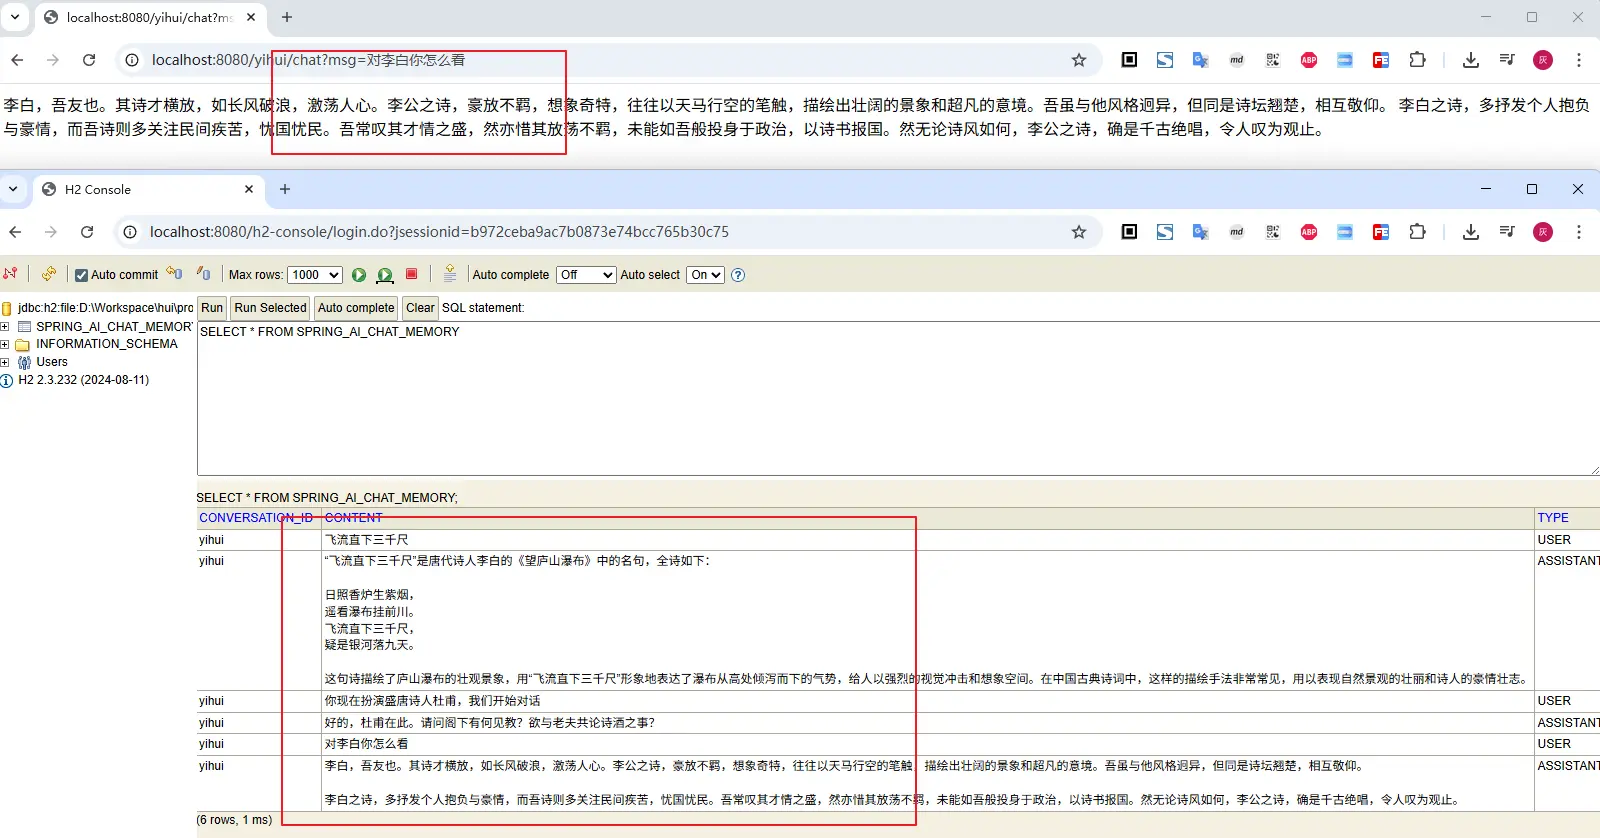
然后进行多轮对话,看看效果,表现和我们预期一致,聊天记录被保存在数据库中
二、小结
本文介绍的是如何借助 spring-ai-starter-model-chat-memory-repository-jdbc 来实现自定义的对话持久化,通过实现h2的Dialect,我们可以轻松实现自定义的持久化逻辑;若希望了解持久化的更多实现细节,可以查看上篇 使用MySql持久化对话历史
这里实现的是基于数据库来进行持久化,那么如果我不是用数据库,比如希望用文件或者redis来实现,又可以怎么做呢?
文中所有涉及到的代码,可以到项目中获取 https://github.com/liuyueyi/spring-ai-demo
微信公众号: 一灰灰Blog
尽信书则不如,以上内容,纯属一家之言,因个人能力有限,难免有疏漏和错误之处,如发现bug或者有更好的建议,欢迎批评指正,不吝感激
下面一灰灰的个人博客,记录所有学习和工作中的博文,欢迎大家前去逛逛

打赏
如果觉得我的文章对您有帮助,请随意打赏。
微信打赏

支付宝打赏