08.MCPServer简单鉴权的实现
约 1244 字大约 4 分钟
08.MCPServer简单鉴权的实现
上面一篇 实现一个简单的McpServer 带大家构建了一个自己的McpServer,其功能非常简单,接下来我们尝试逐步进行补全,我们下来看一下,如何给其加上权限管控,避免服务被白嫖
一、MCP Server搭建
我们直接在前面的搭建的McpServer基础上进行能力扩展,因此整个项目的搭建和相关配置与上文一致,这里不再赘述过程,只贴下核心的信息
1. 项目配置
<dependencies>
    <dependency>
        <groupId>org.springframework.boot</groupId>
        <artifactId>spring-boot-starter-web</artifactId>
    </dependency>
    <dependency>
        <groupId>org.springframework.ai</groupId>
        <artifactId>spring-ai-starter-mcp-server-webmvc</artifactId>
    </dependency>
</dependencies>
配置文件指定mcp server相关参数:application.yml
spring:
  ai:
    mcp:
      server:
        name: date-server
        version: 1.0.0
        type: SYNC
        instructions: "提供获取不同时区的当前时间,并按照北京时间进行展示"
        sse-message-endpoint: /mcp/messages
        sse-endpoint: /sse
        capabilities:
          tool: true # 是否支持工具
          resource: true # 是否支持资源
          prompt: true # 是否支持提示词
          completion: true # 是否支持补全
2. MCP Server创建
一个根据传入时区,返回对应的时间的工具
@Service
public class DateService {
    @Tool(description = "传入时区,返回对应时区的当前时间给用户")
    public String getTimeByZoneId(@ToolParam(description = "需要查询时间的时区") ZoneId area) {
        // 根据系统当前时间,获取指定时区的时间
        ZonedDateTime time = ZonedDateTime.now(area);

        // 格式化时间
        DateTimeFormatter formatter = DateTimeFormatter.ofPattern("yyyy-MM-dd HH:mm:ss");
        String ans = time.format(formatter);
        System.out.println("传入的时区是:" + area + "-" + ans);
        return ans;
    }
}

@Configuration
public class ToolConfig {
  @Bean
  public ToolCallbackProvider dateProvider(DateService dateService) {
    return MethodToolCallbackProvider.builder().toolObjects(dateService).build();
  }
}
二、权限管控
1. 权限管理
我们这里直接采用Http的权限管控,即在请求头中添加Authorization字段,值为Bearer <token> 或者 Basic <user:password>方式
为了针对MCP Server的权限进行管理,我们考虑通过自定义的Filter来实现,具体的逻辑为:
- 拦截
/sse,/mcp/messages请求 - 校验请求头中的
Authorization字段,判断是否满足要求
@WebFilter(asyncSupported = true)
public class ReqFilter implements Filter {
    public static final String TOKEN = "yihuihui-blog";

    public static final String USER = "yihui";
    public static final String PWD = "12345678";

    @Override
    public void doFilter(ServletRequest servletRequest, ServletResponse servletResponse, FilterChain filterChain) throws IOException, ServletException {
        // 打印请求日志
        HttpServletRequest req = (HttpServletRequest) servletRequest;
        String url = req.getRequestURI();
        String params = req.getQueryString();
        System.out.println("请求 " + url + " params=" + params);

        String auth = req.getHeader("Authorization");
        if (url.equals("/sse") || url.equals("/mcp/messages")) {
            if (auth == null) {
                throw new RuntimeException("认证头格式错误");
            }

            if (auth.startsWith("Bearer ")) {
                // 令牌方式
                // "Authorization: Bearer <有效的访问令牌>"
                String token = auth.substring(7); // "Bearer " 长度为7
                if (!TOKEN.equals(token)) {
                    throw new RuntimeException("token error");
                }
                System.out.println("token鉴权通过!");
            } else if (auth.startsWith("Basic ")) {
                // 标准Basic Auth格式解析 Authorization: Basic eWlodWk6MTIzNDU2Nzg=
                // Base64编码的 "username:password
                String encodedCredentials = auth.substring(6); // "Basic " 长度为6
                String decodedCredentials = new String(Base64.getDecoder().decode(encodedCredentials));
                String[] credentials = decodedCredentials.split(":", 2);
                String username = credentials[0];
                String password = credentials[1];
                if (!USER.equals(username) || !PWD.equals(password)) {
                    throw new RuntimeException("用户名密码错误");
                }
                System.out.println("basic auth 鉴权通过!");
            }
        }

        filterChain.doFilter(servletRequest, servletResponse);
    }
}
在上面的实现中,注意两点:
- 注解
@WebFilter,表示这是一个过滤器,并且异步支持(这个异步支持必须开启,否则mcp客户端无法正常连接) - 拦截的url为
/sse或者/mcp/messages: 这里我们分别处理sse请求和mcp请求,将他们与其他的请求区分开- 鉴权逻辑:从请求头中获取
Authorization字段,判断是否满足要求
- 鉴权逻辑:从请求头中获取
然后调整启动类,支持扫描自定义的过滤器
@ServletComponentScan
@SpringBootApplication
public class S08Application {
    public static void main(String[] args) {
        SpringApplication.run(S08Application.class, args);
    }
}
2. Trae调整MCP配置
因为添加了权限管控,所以需要调整MCP的配置,在之前的基础上,加一个请求头
{
  "mcpServers": {
    "时间MCP": {
      "type": "sse",
      "url": "http://localhost:8080/sse",
      "version": "1.0.0",
      "headers": {
        "Authorization": "Bearer yihuihui-blog"
      }
    }
  }
}
接下来走一个验证对比,分别是没有添加权限的以及加了权限管控的
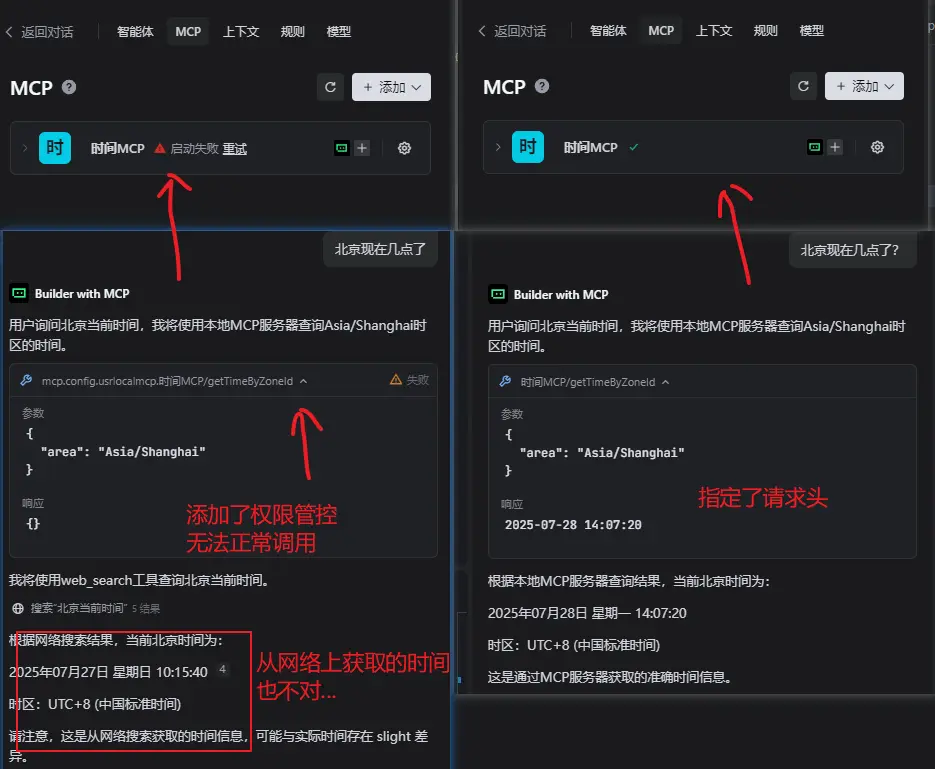
说明:如果是用户名+密码的鉴权方式,则可以将上面json配置中的 Authorization相关内容替换为:
"Authorization": "Basic eWlodWk6MTIzNDU2Nzg="eWlodWk6MTIzNDU2Nzg=为用户名密码的base64编码,解码之后为yihui:12345678
3. 小结
这里我们实现了一个简单的权限管控,通过自定义的过滤器来实现,具体的逻辑为:
- 拦截
/sse,/mcp/messages请求 - 校验请求头中的
Authorization字段,判断是否满足要求 - 添加权限的MCP配置
当然,这里只是简单的实现,实际生产中,我们可以通过数据库来实现权限的存储和查询,也可以通过其他方式来实现权限的验证,例如通过JWT+OAuth2.0的方式来实现;不管是哪种方式,核心的原理依然是web应用鉴权这一套,无非是应用的场景不同,一个是web用户、一个是mcp客户端而已
文中所有涉及到的代码,可以到项目中获取 https://github.com/liuyueyi/spring-ai-demo
Loading...